
Thursday, June 6, 2019
Wednesday, May 29, 2019
project 12 final
https://www.youtube.com/watch?v=YDKpw4S9Zwo
in this video we took many shots of us jumping to give us the illusion of flying. We also reversed a clip to give it a rewind affect.
in this video we took many shots of us jumping to give us the illusion of flying. We also reversed a clip to give it a rewind affect.
Friday, May 24, 2019
Pre-Work:
- Show film/trailer clips from attached page of links (How are images used for symbolism?)
- Take notes
Title of Film or Video:
|
Ways it showed a UTOPIA
|
Ways it showed DYSTOPIA
|
| children https://www.youtube.com/watch?v=BE4oz2u6OHY | everyone was equal everything was neat nobody was unsuccesful | dark everyone seemed sad everyone treaded poorly |
| the plan https://www.youtube.com/watch?v=5Zqmt1H35fs | they had money and a stable life with a house eventually "followed the plan" | they were depressed poor mariage |
| the truman show https://www.youtube.com/watch?v=loTIzXAS7v4 | he has a perfect life in which everything is taken care of | he cant go anywhere and cant choose his own path in life |
Tuesday, May 14, 2019
Friday, May 10, 2019
project 12 prework
“T-Shirt War!!!”
“Minilogue/hitchhikers choice”
“Bloom”
“Fresh Guacamole” by PES
“Minilogue/hitchhikers choice”
“Bloom”
“Fresh Guacamole” by PES
Title of Video:
|
Visual tricks used:
|
Ideas for my animation:
|
| t-shirt wars ---------------- mini-log ---------------- bloom ---------------- fresh guac | changing t-shirts --------------------- use of dry erase and lots of color --------------------- paper mache --------------------- use of every day objects | transferring images from place to place ----------------------------- use of varying colors ----------------------------- scale ----------------------------- use of ordinary objects |
Monday, May 6, 2019
magazine final


Our magazine is about skateboarding in the Lincoln High school area. We tried went and tried to take authentic photos from around the area. I personally made the first four pages.
Thursday, April 18, 2019

Tuesday, April 16, 2019
project 11 pre-work

Inspiration:
I found inspiration in several things. The first thing I found inspirational were unique and different spreads. I really found the different layout variations cool. I also found witty tittles an such inspirational.
Friday, April 5, 2019
project ten final

In this photo, I went for commercial (advertising Lincoln Lacrosse). I went for a shot that encompassed the lacrosse merch. I also adjusted lighting in Lightroom.

In this photo I also went for commercial (advertising for Polo by Ralf Lauren) . In this shot i cam from the top down with shallow lighting. I also made sure the logo was visible. I then edited lighting in Lightroom.

In this shot I went for Sir Theodor Nims exquisite style. I made sure to capture his good side by shooting from a 3/4 angle. I also used a flash and posted editing to give the photo a cool tint.

Tuesday, March 19, 2019
Project ten pre-work (fine arts v commercial)


Nick Fancher
Both of these photos are crisp and expressive. However, what they are expressing is much different. the first photo expresses the person while the second expresses a brand.
Friday, March 15, 2019
project 10 pre-work (commercial portraits)
What are commercial portraits?
Commercial portraits often shows a subject that is using a product or doing the thing being sold. The color and style often matches that of the magazines style and makes room for tittles and other text.


The thing I like about commercial portraits is that they are expressive. However they all seem the same.
Commercial portraits often shows a subject that is using a product or doing the thing being sold. The color and style often matches that of the magazines style and makes room for tittles and other text.
The thing I like about commercial portraits is that they are expressive. However they all seem the same.
Wednesday, March 13, 2019
project 10 pre-work (fine arts portrait)
What is a fine arts portrait?
A fine arts portrait express a mood, story or viewpoint and uses various different tools to help further express that.
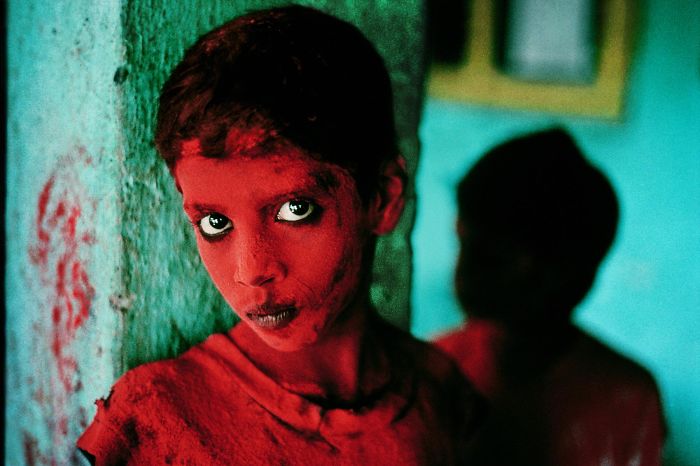
Steve Mercury

Annie Leibovitz
the thing that I really like about these portraits is the strong color and contrast as well as the crispness
A fine arts portrait express a mood, story or viewpoint and uses various different tools to help further express that.
Steve Mercury
Annie Leibovitz
the thing that I really like about these portraits is the strong color and contrast as well as the crispness
Monday, March 11, 2019
project 9


In this photo, I cut out two different subjects and placed them into a background. I then recolored one of the subjects.
Friday, March 1, 2019


Monday, February 25, 2019
Pinhole camera
What is a pinhole camera?A pinhole camera is a camera without a lens but rather a tiny a pinhole (a light-proof box with a small hole in one side). Light from a scene passes through the aperture and projects an inverted image on the opposite side of the box, which is known as the camera obscura effect.
Early pinhole photography:
The first known descriptions of a pinhole camera are found in the 1856 book The Stereoscope by Scottish inventor David Brewster. One older use of the term "pin-hole" in the context of optics was found in James Ferguson's 1764 book Lectures on select subjects in mechanics, hydrostatics, pneumatics, and optics.
How a pin hole camera works:
A pin hole camera works similarly to a human eye. The small hole in the light proof box, similar to a pupil, lets a small amount of light in. The small amount of light get reflected onto film and the photo is complete.
Uses for pinhole cameras:
The image of a pinhole camera may be projected onto a translucent screen for a real-time viewing (used for safe observation of solar eclipses). But it is more often used without a translucent screen for pinhole photography with photographic film or photographic paper placed on the surface opposite to the pinhole aperture.


duegerotypes
duegerotype
The daguerreotype image is formed on a highly polished silver surface. Usually the silver is a thin layer on a copper substrate, but other metals such as brass can be used for the substrate and daguerreotypes can also be made on solid silver sheets.


The daguerreotype image is formed on a highly polished silver surface. Usually the silver is a thin layer on a copper substrate, but other metals such as brass can be used for the substrate and daguerreotypes can also be made on solid silver sheets.
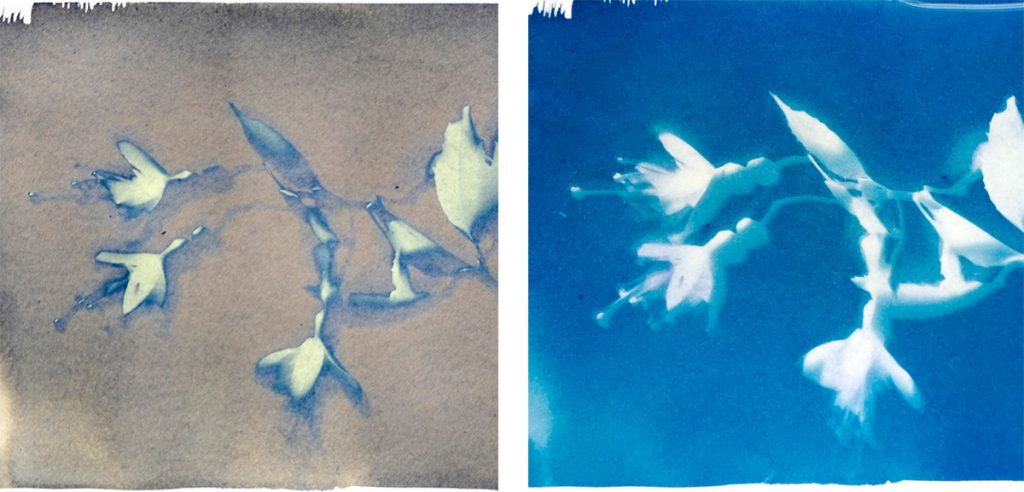
cyanotypes
cyanotype

1. Mix Your Cyanotype Chemistry
These Cyanotype instructions will make up 200ml of working solution, enough to coat roughly 50 A4 sheets.
First off you need to measure 25g of Ferric Ammonium Citrate and add water to bring it up to 100 ml. Next, you measure 10g of Potassium Ferricyanide and mix that with water to make up to 100ml. Make sure both the chemicals are fully dissolved. Finally, under subdued light, mix the two solutions together. You are now ready to coat your paper.
2. Coat Your Paper
The paper should be coated away from sunlight. Tungsten light, as found in most lightbulbs is fine. Use a brush to evenly coat your cyanotype solution. A foam brush will give you a nice even coat. Then, leave the paper to dry in the dark. You should mix the solution as you need it, as it does not keep well. Paper, once you coat it and it is dry, can be kept in the dark until you are ready to use it.
3. Make Your Print
Place a negative or an object onto the prepared paper. A piece of glass over the top will help keep the image sharp. You then leave the paper to expose in sunlight or under a UV lamp. The exposure will time depend on how bright the light is, so you will need to do some testing. The paper will begin to change colour during exposure. The exposed part of the paper will turn a pale bronze colour, this will let you know the print is ready to wash.
3.Wash Your Print
Finally, rinse the paper in water for 2 minutes and you will see the colours reversed. This will also fix your exposed image and make it safe to view in daylight. If you do not have water to hand, place your exposed paper back in a box to wash later.
Tuesday, February 12, 2019
Project 7
HDR


In the photos I edited, I made many copies at various contrast levels for each photo. I then layered them in Photoshop. This gives it the feeling that there is more light than there is.
Panoramas


In these photos I edited, I took a vertical and horizontal panorama. I then edited light levels, contrast, exposer, and colors for each.
Multiple exposers


In these photos I edited, I layered the photos then adjusted opacities.
Monday, February 11, 2019
Project 6.5

In this Project we went to the max station at providence park. When taking the photos we tried to
capture the whole landscape around the area and get pictures from different views.We then printed
them out and collaged them on a piece of poster board.
capture the whole landscape around the area and get pictures from different views.We then printed
them out and collaged them on a piece of poster board.
Subscribe to:
Comments (Atom)